Multi-track Video
How to clone yourself
Like many of my musician friends, I'm finding new and elaborate ways to keep myself and others entertained from the confines of my living room. We've tried a few Zoom sessions which are ok but difficult due to the tech/latency, and we've tried virtual sessions too, which are fun.
I've previously recorded myself via multi-track audio and played around with multi-track video; many videos combined into one. But video has always been a bit of an afterthought.
With this new found time I thought I'd hone my technique a bit, and share with you how I do it, using the Ballydesmond Polkas video.
The concept is quite simple; in the same way as you'd multi-track an audio recording - record the different parts separately then mix it together, you'd do it for both audio and video.
There are a load of free and paid for hardware and software tools available to do this. However, the principles are broadly the same:
- You need to be able to film yourself performing and be able to listen (but not record) playback of the rest of the tracks/mix or click - essentially "playing along".
- You need to be able to combine these "parts" and sync them together so that the parts both align and so does the audio and video.
I've split this into:
- Workflow: The sequence and process to go from nothing to final product.
- Tools: The software and hardware I use
I'd argue the workflow is probably more important than the tools in terms of where to spend the time.
Workflow
The right workflow is key to making life easier, and spending more time being creative and less time fighting things.
Here's a list (in sequence) of how I approach it:
Have a plan
Know what you want to play, how you visually see the final output (ideas for cuts, angles, split screens, zooms etc). This means thinking and planning for:
- Number of cameras you'll use and for what reason (wide-angle vs zoom) and what they are focusing on.
- Camera angles; head on, off to side etc. Also, if you want to achieve that "cloned in one scene" look where you need to keep the scene the same and ensure you can create distinct masks around you.
- Tempo, speed and style of the music and how that is conveyed in video.
- Colour / contrast, do you want it light and vibrant (well saturated) or dark, brooding, etc.
- Introductions, voice overs, b-roll etc to help tell the story.
Find the Space
With audio, its either finding a "nice sounding room" - nice tall ceiling, natural reverb etc. Or finding a very "dead" room and adding EQ & processing to the sound in post. For folky stuff, I'm in the former camp, and my living room has a lovely high Victorian ceiling with a good mixture of soft furnishings to make the room sound natural and warm.
However, adding video into the equation makes it doubly hard to find that right space. Like audio, you take advantage of natural light or artificial light. The later giving more flexibility and control, risk of a very clinical look. The key is light sources, angles and diffusion, it doesn't need to be expensive. I use regular LED bulbs in a standard ceiling rose/chandelier and wall uplighters, and a separate LED panel off to the side which has a soft diffuser so that the light is less harsh.
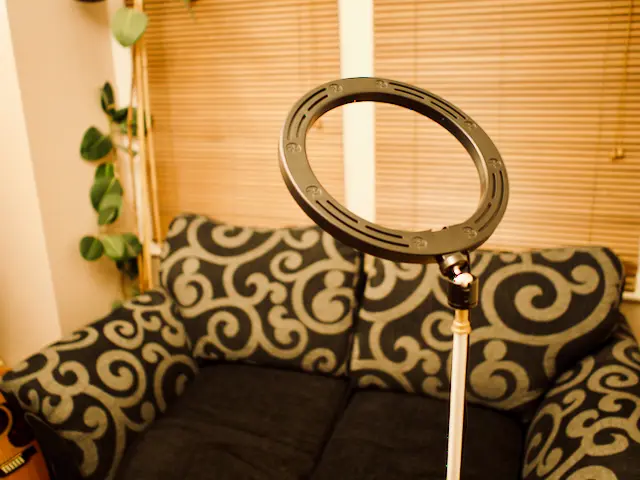 Figure 1. LED panel
Lighting style is really down to preference and the "look" you want to create. I've not really found a "look" but I like the darker approach where the focus is on the instrument and where the musician "pops" out of the background which can be achieved with some good lighting angles, typically overhead and side angle.
Use a click track
Also, start with melody and record rhythm later (works well for me as most stuff I play is traditional and has a certain structure and lead in). If you can't use a click - keep it steady!
Capture Well
I'm capturing audio and video separately (you don't have to, but camera mics aren't great). Audio is captured into Logic in the same was as any audio multi-track (mics and interface). The allows me to bounce down a single stereo mix of all the parts and to ensure the levels, EQ etc. Video also captures audio (via camera microphone) but is only used for syncing. I'm recording video and audio at the same time, literally pressing record at the same time (small difference doesn't make a difference - since Final Cut handles the sync part).
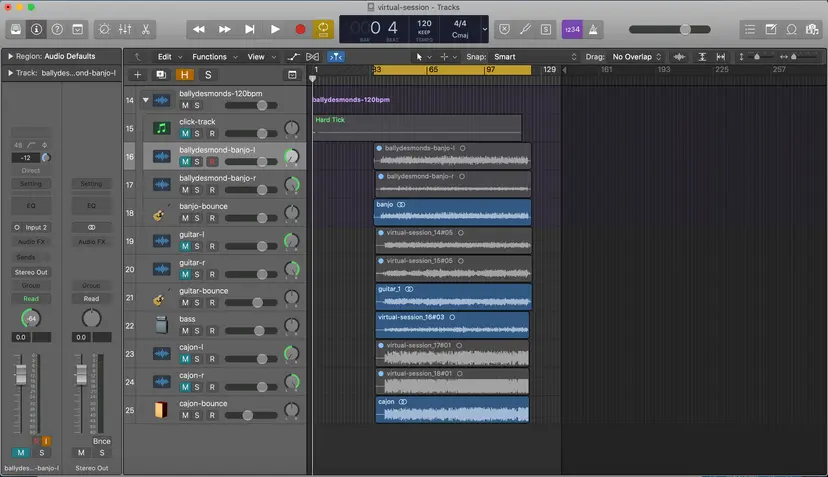 Figure 2. Multi-track audio in Logic, bouncing down to final stereo mix
Figure 2 shows:
- The click track (don't actually need this as Logic has a metronome)
- The raw left & right tracks for guitar and banjo, their stereo bounce
- The DI bass
- The left/right+bounce tracks for the cajon.
Import
Once all parts are captured, the videos and final stereo mix are imported into Final Cut. I typically create separate libraries, events and a project for each tune set as they are pretty self contained and it keeps the file size smaller.
Create Multi-cam Clip
First "post import" step is to select all the video and stereo mix and create a Multi-cam clip. This sometimes requires a bit of tweaking to add in additional angles and clips if it can't sync itself.
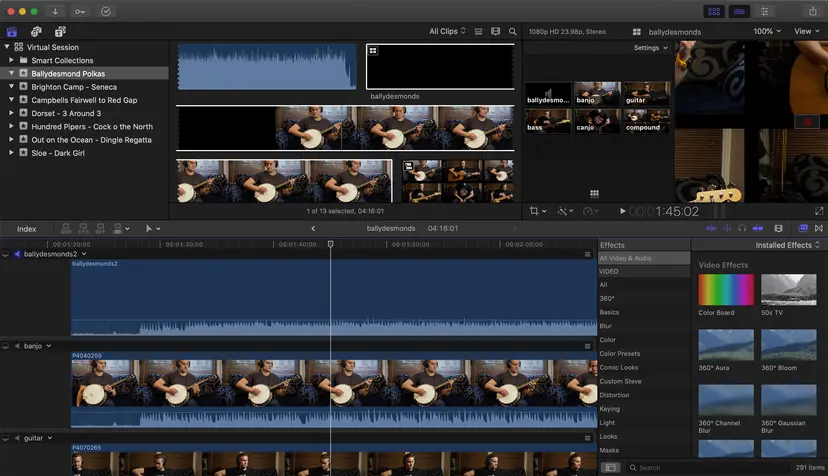 Figure 3. Creating the multi-camera clip
Create Composite clips (if needed)
Where I want to add multiple clips in the same screen, I use the compound clips. Typically dropping all the clips in a different timeline, syncing them and select + New Compound clip. I then add this compound clip into my multi-cam clip so that I can cut between it like any other angle.
Assemble
The multi-cam clip is then dropped onto the timeline, topped and tailed with a title & fade.
Using the multi-cam view and blade tool add the cuts between the parts (video) whilst keeping the audio angle using the stereo mix.
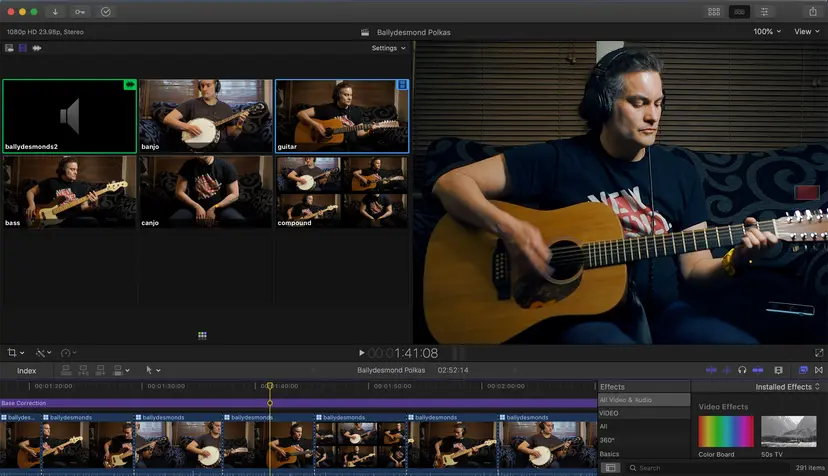 Figure 4. Making cuts between the multiple camera angles
Transitions & Keyframing
Keyframing is a great way to create movement within a clip. Simply pan, crop and frame using keyframes to create a fluid sense of movement and interest.
Use transitions (fade, blur etc) between cuts to mix up the flow.
Colour Grading
If you are using artificial lighting or you are able to shoot with natural light quickly, for example; don't shoot one part in morning and another in the afternoon - as I have done in this video with banjo vs other instruments, then you shouldn't have to worry too much around clip colour matching (so skin tones, light etc are consistent). If not then its wise to do basic colour balancing right after import.
I usually finish off with a colour grading / adjustment layer shamelessly a bit of teal and orange which helps the foreground pop a bit.
Export
Enjoy and share!
Tools
I've been recording audio for years and have used loads of different software and hardware combinations, but all pretty much do the same job:
- Macbook pro
- Logic Pro X (10.4.8)
- Final Cut Pro (10.4.8)
- Using stereo mic'ing recently as it gives a more natural room performance sound with a pair of Rode NT5's (spaced pair). Electric bass/guitar typically DI'd and using Logic's pedal board/amp sims.
- Audio interface is Focusrite Clarett 8Pre. I'm a long term use of Focusrite kit and love it. This unit has beautiful mic pre-amps that are super clean and accurate.
- I've never owned a video camera, but have found great success with DSLR's (5DmkII) and mirrorless (Olympus Pen-F). Sticking with 1080p24. Would be nice to shoot higher resolution so that I can crop and not loose output, as I tend to stick to 1080p23.98 output.
- Lighting, typically natural + ceiling lights and an LED spot. Have lofty ambitions for Aputure 120D + soft box when wallet allows. May consider 3x point lighting, and I like rembrandt lighting style
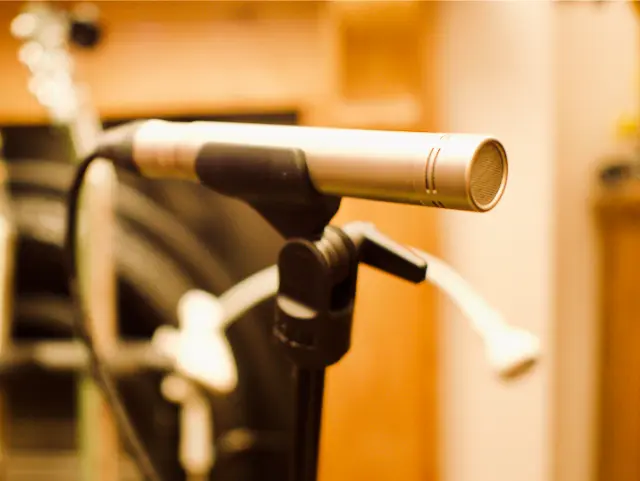 Figure 5. Rode NT5
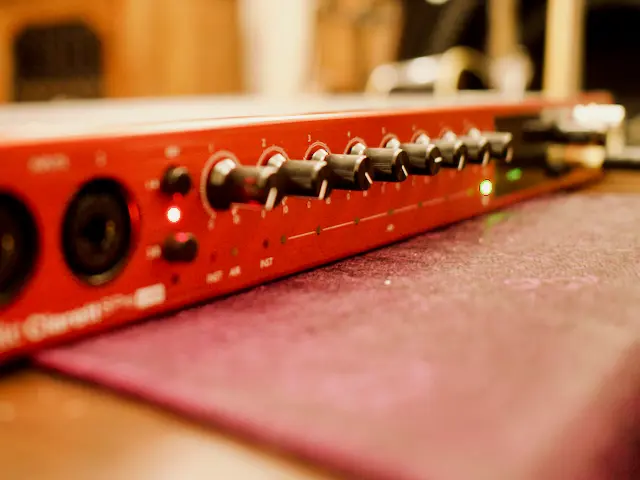 Figure 6. Focusrite 8Pre